Welcome, Guest
Username: Password: Remember me
  • Page:
  • 1

TOPIC: Mounts for the new Spectre Motors.

Mounts for the new Spectre Motors. 1 month 4 days ago #2120

  • rogersimmonds
  • rogersimmonds's Avatar Topic Author
  • Offline
  • Administrator
  • Administrator
  • Posts: 594
  • Karma: 8
  • Thank you received: 166
Though we intend to make a selection of jetex.org models again available as 'part kits', most of our designs, and the classic models of yesteryear, will be built from either templates or plans. So the builder will have to make their own motor mounts. A description of how I make them (other folk may do it differently) is therefore timely. The mount I describe will be for the Spectre L-2, for which, serendipitously, these is a sutable Estes motor tube that can be modified for our purposes.


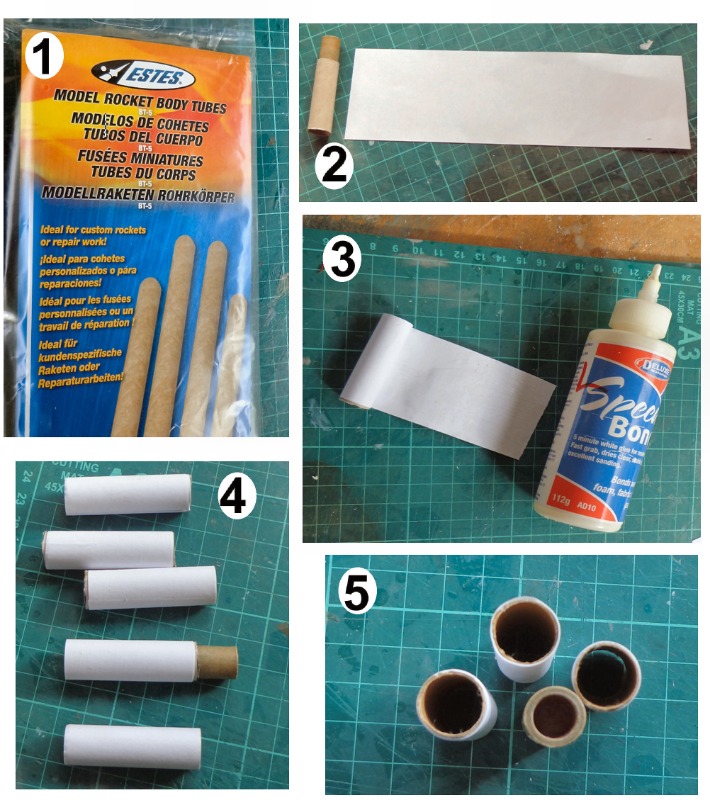
1; the Estes motor tubes come in large (and long) packs that should last many years (I can supply suitable short lengths if required). I cut off about 3/4 the length of the motor.

2; 15 cm (or so) of 80 gsm printer paper is cut to the same width as your tube.

3; spread with PVA glue and wound tightly around the tube. Leave until completely dry.

4; the dry tubes are trimmed'

5; first stage complete - the tubes are now robust and ready for the next stage. I tend to make several at time. A used motor is useful to check the prepared tubes are still round and will fit!


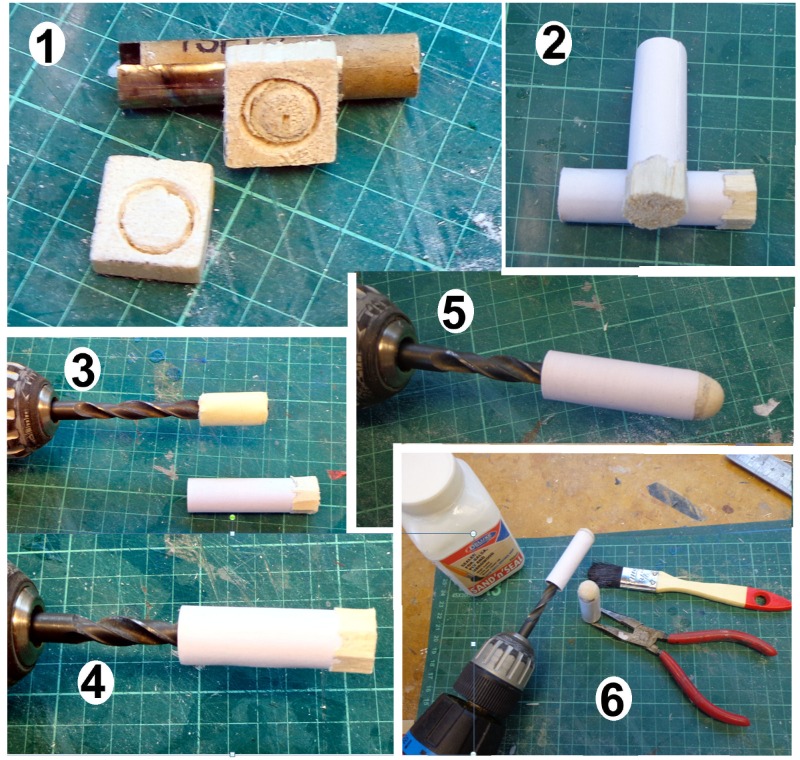
1; light balsa, 5 mm (or so) thick is grooved (note my special 'grooving' tool) to fit the tube.

2; The tube is glued to the block, which is trimmed roughly to shape.

3; the fun bit. A drill bit is wrapped with masking tape to fit the tube so that you have, in effect, a lathe (4) so that the end block can be symmetrically and enjoyably sanded to your desired shape (5). Rounded or blunt - the choice is yours. :dry:

6; two coats of 'Sand 'n' Seal' with rubbing down (still on the 'lathe') between coats completes this stage.
Attachments:

Please Log in or Create an account to join the conversation.

Mounts for the new Spectre Motors. 1 month 4 days ago #2121

  • rogersimmonds
  • rogersimmonds's Avatar Topic Author
  • Offline
  • Administrator
  • Administrator
  • Posts: 594
  • Karma: 8
  • Thank you received: 166
The next steps are shown below:


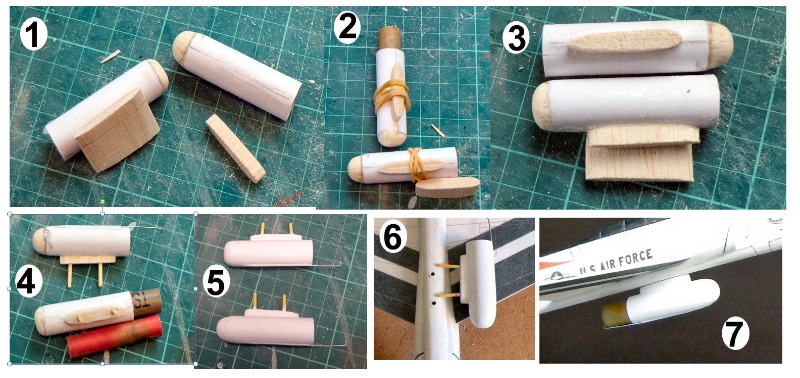
1; a spacer, 5 mm wide is cut from pre-shaped 1/8" balsa sheet.

2; this is securely glued to the motor mount, making sure it is straight and square. This is one of the very few times I use epoxy glue.

3; The spacer in place - note the streamlined shape.

4; I glue in two short lengths of cocktail sticks. Hopefully, these key into a hard balsa block in the fuselage and prevent the motor mount coming off in a hard arrival (something you do not want!). Note also the22 SWG wire clip. This is glued in place and the joint covered with a strip of paper and cyano glue.

5; a couple of coats of paint smartens everything up! Note the 20-22 SWG wire clip/retainer! This is important : without this your motor will fall out at the worst possible moment - when you launch the model. :woohoo:

6; two holes are drilled in the fuselage for the key. Glue in place - a slow setting epoxy is useful here so that you can check everything is straight and lines up!

7; mount in place; - ideally, the motor should be under, or just a bit forward, of the CG.
Attachments:

Please Log in or Create an account to join the conversation.

Last Edit: by rogersimmonds.
  • Page:
  • 1
Time to create page: 0.521 seconds
Powered by Kunena Forum